
Andromeda Galaxy + Two Neighbors
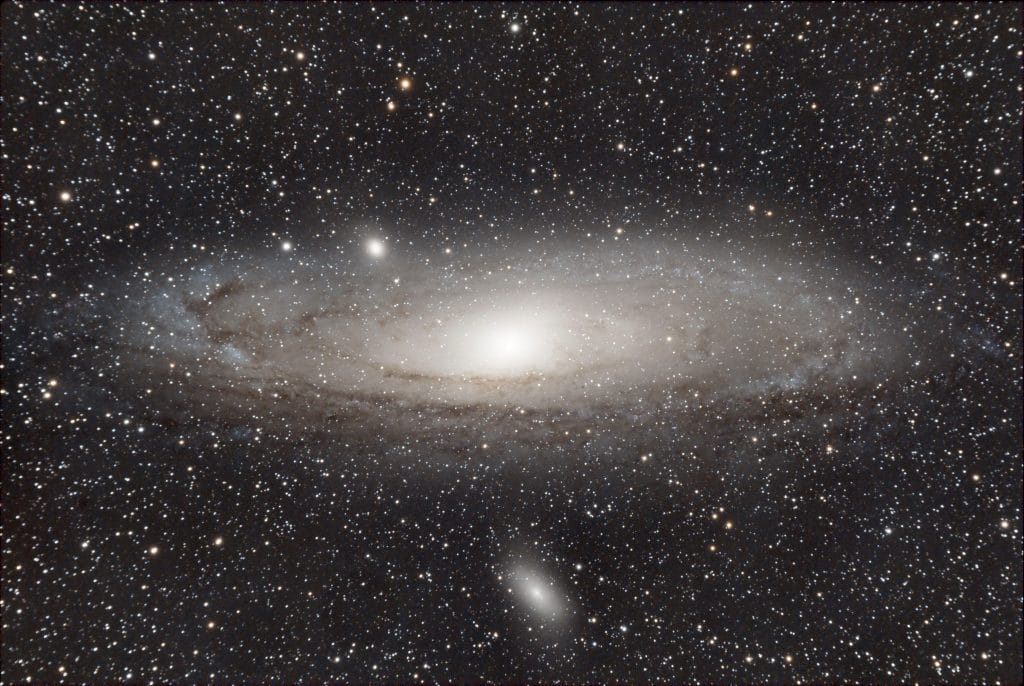
Our nearest neighboring galaxy is the Andromeda Galaxy. It is large enough that if our eyes could make out its entire faint disc it would appear around the same width as 5 or 6 full moons, but its core is bright enough that it’s visible to the naked eye from a decently dark site. Between being near, large, and bright, it’s an ideal target for relatively low magnification; even a standard DSLR and everyday lens could do it. Plus, as a bonus, there are two smaller galaxies very close within the same field of view.
This is a target I’ve wanted to image for a while. It’s proximity and size lend well to being able to draw out some really nice detail of its dusty lanes and depth in its disk. But until recently I didn’t have a scope and astronomy camera combination with a wide enough field of view to get the whole thing in one frame. My EdgeHD 8 is far too magnified to fit it even with the focal reducer, and while the focal length on my 12″ Newtonian is only about 1500mm, the Dobsonian mount is not meant for imaging for multiple reasons… No tracking mirrors, no counter rotation, etc.
Gear
I picked up a gently used less-than-a-year-old APO refractor while I was in Milwaukee over the 4th of July week this year. I’ll write more on the new scope in a separate post, but it fit the bill perfectly for this target. The winning combination was:
- William Optics FLT91 telescope
- William Optics 68III 1x field flattener
- ZWO ASI2600MC Pro primary camera
- ZWO Mini Guide Scope
- ZWO ASI224MC guiding camera
- Celestron AVX mount
- ZWO ASIAIR Pro
The FLT91 fits Andromeda in its natural field of view, but sort of just barely. So, I added the flattener to make sure I didn’t end up with irregular geometry at the corners and edges of the image, where the galaxy was going to be very close to in this field of view. Specifically, the flattener prevents stretching at the edge of the image from the extra refraction of the light as it gets further from the lens’s center. This aberration usually presents itself as oval stars around the edge of the image that look as if they are radially pointing back to the center of the image. A field flattener is common and generally a good tool to use in an astrophotography rig, and it was something I was going to add eventually, regardless. It also presents no issues when using the scope for direct viewing, if I ever decide to put an eye piece in place of the camera.
Imaging
I acquired this data from my back deck just outside of town, on a so-so night in terms of seeing conditions. I didn’t even use a light pollution filter because I was too lazy to disassemble and reassemble the light train to screw it in. I managed to collect 30 frames at 5 minutes each for a total of 2.5 hrs of data and only had to throw out one or two for airplane/satellite trails. All things considered, I’m not disappointed at all and the new scope performed excellently.
My only complaint is that I think my field flattener was not exactly at the right point in the light train. It’s easier to see in the full quality image on my computer, but I still see some slight start elongation in the corners. To correct this for next time, I acquired digital calipers and made slight adjustments. I was only off by about a half a millimeter or so, but that can be enough to make a difference. And while I was at it, I cleaned and threw in my light pollution filter. Next time I’m out, I’ll run a few starfield test shots and hone it in even more, if it needs it.
Calibration Frames
I’m often a little lazy/impatient when it comes to talking calibration frames for my imaging; just gimme that data! So, true to form, I didn’t take any this time around. It was also a bit of an experiment because I had heard that the ASI2600 doesn’t really need darks and bias frames, and I wasn’t terribly compelled to take flats for the FLT91 since it was so new that the glass still looked pristine; no dust motes etc to worry about distorting my image. I’m really pleased with the way it turned out without them and since I haven’t built a library of calibration frames for the 2600 yet, it saved me hours of time.
Re-do
I am very happy with the clean data in this image and the results; however, I may take one more pass at post processing. I could start to see the blues in the galaxy coming out, but I don’t think I succeeded at pulling it out quite as far as I could’ve. If I redo it, I’ll update here with Andromeda v2!